Growing your own food can be good exercise and could save you money.
It can also provide you with a healthy supply of fresh, seasonal fruit and vegetables.

It’s easy to get started and there are lots of places you can grow plants, even if you don’t have a garden. More people are getting interested in growing their own fruit and vegetables, for many different reasons:
- It could save you money on expensive items like salad leaves
- Gardening is a cheap form of exercise and a great way to burn calories and get some fresh air
- It helps children understand where food comes from, and could encourage more interest in eating fresh fruit and vegetables
- Growing your own can help you get your five-a-day portions of fruit and vegetables
- You’ll become more aware of what’s in season, so you may find it easier to choose seasonal food when you go shopping (seasonal food is likely to need less energy to produce)
- Gardening can be a sociable activity which involves you in your local community
- It can help to reduce stress and can give you a sense of achievement

Blueberries taste delicious whether eaten fresh or cooked.
The bushes can be evergreen or deciduous and usually grow to about 1.5m high.
They do well in pots and you can get a reasonable crop whatever the size of your garden.
What to do
Soil preparation
- Blueberries need light, free-draining acidic soils, with plenty of rich, organic matter if they’re to thrive. The soil should have a lower pH of between 4 and 5.5, similar to the requirements of rhododendrons and camellias. It’s possible to lower the pH levels of your soil with sulphur chips or dust. However, they’ll need to be added three weeks before planting to take effect.
- Monitor the soil’s pH every few years, because it may be necessary to add acid. If you don’t have suitable soil you can grow blueberries in a pot containing ericaceous compost, giving the plants a high potash feed (such as tomato feed) occasionally during the growing season.
How to plant
- Plant two different varieties of blueberries to ensure cross-pollination. A single blueberry plant will produce fruit, but the yields will be higher and the fruits bigger if more than one plant is grown. They need a position in full sun or light shade.
- Plant blueberries in autumn or winter leaving about 1.5m (5ft) gaps between them and mulch with a layer of acidic peat, wood chippings or pine needles.
- Water in well using rainwater rather than tap water if possible.
- Tap water contains lime which renders the soil less acidic over time.
Aftercare
- Use nets to protect plants from birds in the fruiting season.
- Mulch each spring. Chipped up pine tree or pine needles are ideal mulches to place around plants because they’re fairly acidic.
- Water plants regularly. They need water from when their buds begin to show in spring until their leaves fall in autumn.
- Remember to use rainwater.
Harvesting and storage
- Blueberry fruits, which are borne in clusters, ripen at different times. This could mean having to regularly pick the same bush over the ripening period.
- Fruits are ready to pick when they have turned a deep blue.
- The fruit should easily pull away from the cluster when ripe.
- Leave them on the bush for a few more days after they turn blue for a more intense and complex flavour. They must be picked or they’ll drop.
Pruning blueberries
- Blueberries produce fruit on branches that were produced the previous year. For the first two or three years of a blueberry’s life it’s not necessary to prune it much, apart from keeping the plant tidy. After this, blueberries need regular pruning to maintain plant vigour and high quality berry production. Prune them between November and March when the plant is dormant.
- When pruning, take out any dead, dying and diseased wood. Locate the oldest canes and remove one or two at the base each year. Remove the old canes that don’t produce much fruit to make way for younger, more productive canes.
- Prune out low branches that will lie on the ground when laden with fruit and remove all twiggy wood on the ends of fruiting laterals.
Varieties to try
- ‘Earliblue’ – a vigorous, early ripening variety. It has medium to large, light blue berries, excellent sweet flavour and impressive autumn colour.
- ‘Bluetta’ – a fairly tasty and vigorous, compact variety, with a spreading habit, producing a medium-sized, light blue berry.
- ‘Patriot’ – a high-yielding, vigorous, hardy variety with medium to large blue berries and excellent flavour.
- ‘Bluecrop’ T- large, light blue berries with good flavour. It’s slightly aromatic and has excellent orange and copper leaves in autumn.
- ‘Herbert’ – arguably the tastiest variety of blueberry. It produces large berries and has moderate vigour.
- ‘Bluejay’ – a mid-season, fast-growing, reliable variety that has superb autumn colour. It only produces moderate yields of medium large berries, but has a good, slightly tart flavour.
- ‘Ivanhoe’ – mid-season, erect variety with large, delicious, dark blue berries. A vigorous plant with good autumn colour.
- ‘Bluegold’ – a mid- to late season variety, vigorous but low-growing, with high yields. It’s ideal for growing in pots and produces very tasty berries in August. The fruit has a longer life than most varieties.
- ‘Coville’ – very late, vigorous variety with large fruit that can be left on the bush for a long time before dropping.
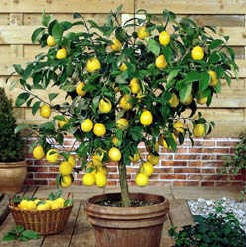
Citrus fruits are known for their fragrant aroma that can relieve stress and relax the soul and body.
They are healthy and have a lot of benefits if consumed on a regular basis.
The leaves and buds are used for producing herbal medicines and are known to cure a lot of ailments.
Some of them have natural medicinal properties besides providing fruits all through the season.
Most citrus fruits have distinct flavours. They are typically evergreen trees and can grow to a height of about 25 feet.
A lot of citrus trees like grapes, lime and mandarins are found to grow best in the warmer climate regions. The quality of the fruit can vary, even with the slightest change in temperature. The Gulf coast is best known for its tender juicy mandarins, as it has temperate weather throughout the year.
The taste and colour of the citrus fruits would depend on the temperature of the region so care should be taken to keep the temperature constant at 20 degree Fahrenheit. Seasonal changes have a direct impact on the produce of the citrus trees.
Why grow citrus trees?
A medium sized citrus tree could provide fruits for a maximum period of 4 – 5 months. They are rich in vitamin content and have been seen as a natural herb for curing many ailments.
Choosing a tree
It is better to get a fully grown sapling as it is easier to spot blemishes and other defects. Select a sapling that has wide spread of branches with shiny leaves.
Soil and fertilizers
Citrus trees generally grow best on acidic soil. You can add pine bark along with manure to increase the acidic condition of the soil. There are a lot of fertilizers that are available on the market for citru trees.
Giving the right amount of water and fertilizers will keep the tree healthy and free from insects and other pests.
Where to plant
- Citrus trees need to be sheltered from the harsh rays of the sun and stormy winds. Plant trees in a south facing plot to expose them to the needed warmth and shade. It is best to plant them beside a fence as it would lend support as well as shelter.
- Spring is considered to be the best time for planting them.
- The situation should not get waterlogged and should have a good drainage system.
- A hole of about 2- 4 feet should be dug to hold the soil and manure that would firmly support the sapling.
- It is best to leave 2 or 3 inches above the ground for the manure to be evenly spread out.
- Apply enough mulch around the base to keep the water out and this would also help in keeping the insects at bay.
- Most citrus fruits trees need to be pruned regularly to prevent the branches from colliding with each other.
Maintenance and care for citrus trees
- Water them regularly as it takes time for the roots to develop and spread beneath the ground. For any tree to mature, it can take between 3-5 years. The citrus tree needs to develop strong roots and healthy leaves for producing quality fruits.
- As the tree develops there should be tiny buds that would start to blossom during the early winter. The buds will open during spring releasing a subtle fragrance.
- The buds later develop into fully grown fruit and will take weeks to reach a ripened stage.
- It is very important to maintain a constant temperature and to provide the needed moisture for better fruit.
- It is also essential to provide enough water, shade, and minerals for the citrus tree to attain a mature stage.
Pruning
Proper pruning has to be done for the branches to spread out and grow in an orderly fashion.
This is the easiest way to prune citrus trees.
- Do nothing until the tree is as tall as you want it to get. Under ten feet is best.
- Top the tree when it reaches the desired height. This just means to cut straight across the top. This forces the tree to branch out and become bushy.
- Trim the tree to maintain the bush shape every year just after it fruits.
- These bushy little lemon and orange trees produce tons of low hanging, easy-to-pick fruit.
 Bare-rooted currant varieties are widely available for planting between October and March.
Container-grown currants can be planted all year round, as long as the soil isn’t frozen or waterlogged.
Try to buy a two-year-old plant – once planted it will remain productive for almost 20 years.
Grow currants in well-drained soil, which has been enriched by adding plenty of well-rotted manure. Choose a slightly sheltered spot, and although plants prefer full sun, they will tolerate dappled shade.
What to do
How to plant
- Dig a hole wide enough for the roots to be spread out and deep enough so the soil mark on the stem is level with the surface of the soil.
- Put the bush in the centre of the hole and gradually fill with soil, firming as you go.
- Water and finish by spreading a layer of well-rotted manure over the root area of each plant.
- If you’re planting a number of red and white currant varieties, leave 1.5m between plants and 1.8m between rows.
Training and pruning red and white currants
- Red and white currants should be trained as an open centred, goblet-shaped bush – this allows light and air to flow freely around the branches, and makes picking easier.
- After planting, pull off any suckers growing from beneath ground level and cut back to the stem any branches less than 10cm above the soil – this will give the bush a short leg.
- Prune all other branches to a third of their original length, cutting to an outward facing bud.
- In following years allow branches to grow in the main framework until your bush fills its allotted space. Then, prune back the upright growing leading shoots to half their length, cutting to an upright bud.
- At the end of June, prune back side shoots to half their length and then to two or three buds in winter.
Training and pruning blackcurrants
- After planting blackcurrants, prune each branch back to within two buds of ground level to leave a mass of stubby shoots.
- At the end of the first growing season, remove any spindly shoots and select one strong shoot, cutting it to soil level.
- In following winters, take out branches that grow away from the bush at a sharp angle. When fully grown, simply remove a quarter of the two-year-old branches (grey colour) and older branches (black colour) in winter, cutting right back to the base.
Aftercare
- Keep soil beneath plants weed free and remove any suckers from white and red currants.
- Ensure plants are watered regularly during dry weather, but don’t overdo it, as too much when the fruit appears can cause them to split.
- Apply a layer of well-rotted manure over the root area each spring.
Harvesting
Cut whole bunches when the fruit is ripe, but still firm.
Tip
Birds like to eat the developing buds of currant bushes, so protect plants in the winter. If you have a large garden, a fruit cage is ideal, alternatively, cover plants in bud with anti-bird mesh.
Five red, white and black currants to try
- ‘White Versailles’ – large, sweet, yellowish fruit in early July
- ‘Jonkheer van Tets’ – heavy crops of large red currants in early July
- ‘Junifer’ – masses of red currants
- ‘Ben Lomond’ – Tasty, black currants
- ‘Ben Sarek’ – Large black currants on a compact bush. Ideal for smaller gardens

Espalier fruit trees are trained to grow against a wall. It makes the tree easier to prune and the fruit easier to pick.
You can buy a ready-trained tree.
Perfect for the small garden, an espalier tree has branches trained horizontally on either side of the stem to make a compact, but productive tree.

Many varieties can be bought as bare rooted trees in the winter.
You can also buy espaliered trees in pots at garden centres which are available all year round. These are perfect for growing where space is limited.
The trees usually have two tiers of branches and will quickly make three or four tiers.
What to do
Make your support
Choose a sunny wall or fence and fit a framework of horizontal wires that match the distance between the arms of espaliers – usually 35-45cm (13-17in) apart.
Most ready-trained trees come with two tiers of branches, but it’s easier to fix three or four supports now than when the tree is growing. If you have a fence, drill holes between two posts and fix wires using eye bolts. Use vine eyes and a tightener on walls.
Planting tips
Dig a planting hole 15cm (6in) from the fence or wall, wide enough for the roots to be spread out and deep enough so the soil mark on the stem sits at the same level as the soil. Fork over the bottom of the hole.
Soak the plant thoroughly and allow to drain.
Place the tree in the centre of the hole and check the level by placing a cane across the gap – add or remove soil as necessary.
Fill the hole with soil, firming gently until you reach the top.
Firm the soil with your heel, drench with water and mulch with well-rotted manure.
Tie side branches with twine in several places to your support wires running along the fence.
If planting a container-grown tree, dig a hole twice the diameter of the pot and deep enough for the rootball to sit at the same level as the surface of the soil.
Aftercare
Water trees well for the first couple of years, especially during periods of drought.
If planting in autumn, allow the central shoot to grow upwards over spring and summer. The following winter, prune to the third wire leaving three healthy buds to produce your third tier of branches. Repeat to make four tiers.
Prune shoots growing from the horizontal branches between July and September leaving three or four leaves, and shoots growing from the main stem shortened to three leaves.
Regularly tie down new growth at the ends of each branch to stop it growing upwards.
Harvesting apples
When to harvest
To determine if the fruit is ready to be picked, place a cupped hand under the fruit, lift and gently twist. If the apple doesn’t come away easily in your hand, then it’s not ready to harvest.
Storage
What to store

- The length of time that apples can be stored varies depending on the variety.
- Apples that ripen later in the year will store for longer than the early varieties.
- Slight insect damage on the skin is harmless, but don’t store any bruised fruit
Where to store
- Apples need a cool, frost-free environment, where they can last for weeks, even months in winter. A garage or garden shed is perfect.
How to store
- Take a good look at each apple and give it a quick clean with a cloth.
- If any are bruised, take them into the kitchen and eat them now. They’ll taste good, but they won’t keep and if stored, may rot and infect other fruits.
- Wrap the apples loosely in newspaper, and sit them on a seed tray or shelf.
- Check them periodically over winter and remove any which show signs of rotting
Future harvests
- Apply a grease band around the trunk of your apple tree to stop female winter moths from climbing the bark and laying their eggs in the tree.
- This small preventative measure will stop this pest from attacking any developing fruit and leaves next spring. Grease bands can be bought from most good garden centres.
Five apples to try
- ‘Discovery’ – a rosy red apple with a sharp taste
- ‘James Grieve’ – an early apple, ready from mid-summer onwards
- ‘Lord Lambourne’ – an older variety that produces delicious, thin-skinned green apples
- ‘Katja’ – a tasty apple that grows vigorously
- ‘Bramley’s Seedling’ – a cooking apple which stores very well

The most commonly planted fruit trees are apple trees but pear, plum, fig and medlar trees can also produce good results.
Different varieties produce their fruit at different times of year.
The fruit of early ripening trees tends not to keep well whereas later ripening varieties are suitable for storing over winter.
Nurseries attach part of one tree to another recommended for growing fruit – this is called grafting. This joins the healthy rootstock of one tree and the tasty fruit of another. Rootstocks come in various sizes. Look for ones labelled M27 or M9 which suit most gardens, or ask your nursery.
You need to be aware of the potential size your tree will grow to and whether it’s self-fertilising. Self-fertile trees will produce fruit without the need for another tree to pollinate it. If your tree is not self-fertile it will need to be paired with another one.
What to buy
Trees can be bought either in a container or bare-rooted. Look for well-developed fibrous roots. For container grown trees, check that roots aren’t congested and choose younger trees (1-3 years) which tend to establish quicker. Avoid plants that show any sign of disease.
What to do
Preparing the tree
- Soak the roots before planting. Bare-root trees can be planted late autumn to early winter as this is when the tree is in its dormant stage.
- Avoid planting if there’s a frost – place roots into moist soil until conditions improve.
- Container-grown trees can be planted at any time of year except when frosty or if the soil is too dry or too wet.
Planting your tree
- Place your tree in a sunny and sheltered position. This will maximise the time your fruit has to ripen.
- Dig a hole a third wider than the roots and to the same depth as the tree’s roots, firming the bottom of the hole into a slight mound. Insert the stake and your tree.
- Fill in with soil and mound towards the base of the tree attaching it to the stake.
- If you’re growing your tree in a container, half fill a large tub with soil-based potting compost and place your tree on top. Fill the tub with more soil to the base of the tree, water well and feed regularly.
Fruit trees for a small space
A great way to make use of limited space is to train the tree along a south-facing wall or fence. Using a wall or fence allows for a longer ripening time as the wall will soak up the heat.
Make sure the structure is strong enough to support the tree in crop.
Aftercare
- To protect your fruit tree from moths that will destroy the fruit and leaves, apply a grease band 45cm (18in) above soil level to the stake and trunk of your tree.
- This is a sticky paper or glue that will stop wingless female moths being able to reach the branches of the tree to mate, of which its caterpillars will eat the leaves and fruit.
- Grease bands should be applied late October and reapplied as necessary.
- Additionally, apply a plant oil-based winter wash in December or January to kill off any overwintering pests.
Five fruit trees to try
- Malus domestica ‘Queen Cox’ – self-fertile, juicy red-yellow apples from mid October
- Pyrus communis ‘Conference’ – partially self-fertile pear, green-yellow sweet fruit from October to November
- Prunus domestica ‘The Czar’ – self-fertile dark purple dessert plum, resistant to frost
- Ficus carica ‘Brown Turkey’ – self-fertile fig ideal for training along a wall. Rich fruit from August to September
- Mespilus germanica ‘Royal Medlar’ – self-fertile dessert fruit from November

There are many types of grapevine – some can be eaten as a dessert or can be used to produce wine – some can be used for both. Some are tender and need the shelter of a greenhouse to crop well. If you don’t have one, don’t worry, there’s a good range that can be grown in well-drained soil, against a south or west-facing fence or wall.
What to do
Supporting plants
- Make a support on a fence by installing four support wires. The first should be 40cm (16n) above the ground, and the others 30cm (12in) apart.
- Mark the positions of the wires on the fence posts and drill through. Push an eye bolt through each hole and loosely secure with a nut.
- Wearing a pair of gloves, thread wire through the first eye, then bend it back and twist to hold. Wind the wire out to the second post, cut with pliers and thread through the eye bolt.
- Pull tight, twist and secure as before. To take out slack in the wire, tighten by turning the bolts with a spanner. Don’t overdo it, as it could put a strain on the fence.
- Secure the other three wires. If you have a wall, use vine eyes instead.
How to plant
- Dig a hole wider and deeper than the root ball of the plant, 15cm (6in) away from your fence or wall.
- Put the plant in the hole and start to fill, firming as you go – ensure that the top of the rootball is level with the surface of the soil.
- Push a 1.8m (6ft) cane behind the vine. Cut the vine back to leave three healthy buds, which are below the bottom wire of your support system.
- Tie the stump to the cane and secure the cane to the supports. Spread a thick layer of mulch over the root area of the vine.
Training plants
- Allow three stems to grow vertically during its first year, securing them to the cane and pinching any shoots that grow from the side to one leaf.
- When the foliage falls in the autumn, untie the stems from the cane and tie two down to the bottom wire, one each side of the cane.
- Prune the third stem, leaving three buds to provide replacement stems next year. In spring, allow shoots to grow vertically from the branches that have been tied down. Aim to have shoots every 15cm (6in) – you may need to prune some out to achieve this.
- Pinch off side shoots to leave one leaf and when the shoots reach the top wire, pinch off their growing tips.
- Tie the three replacement shoots to the centre cane. When fruit appears, remove some leaves if necessary to improve air flow to the grapes. In the autumn, cut off the horizontal arms and repeat the process.
Five grapevines to try
- Vitis vinifera ‘Perlette’ – green seedless fruit. Outdoors
- Vitis vinifera ‘Schiava Grossa’ (Black Hamburgh) – dessert variety with dark purple fruit with a white bloom. Best indoors
- Vitis vinifera ‘Muscat of Alexandria’ – fine-flavoured green dessert grape. Indoors
- Vitis vinifera ‘Siegerrebe’ – white grape for eating or wine. Outdoors
- Vitis vinifera ‘Regent’ – wine or dessert grape with good autumn colour. Outdoors

There are many varieties of gooseberry to try, from ones that produce tiny, sweet yellow sugary fruits to ones that produce large, red dessert types.
What to do
Soil preparation
- The ideal time for planting gooseberries is in the autumn. Prepare the soil thoroughly in your selected sunny, sheltered site.
- Fork over a wide area to break up the soil and remove weeds, then dig out a planting hole. Fork some compost or rotted manure into the soil at the base, along with a handful of granular or pelleted general purpose fertiliser.
How to plant
- Plant bare-rooted bushes by spreading their roots out in the hole and covering with well-conditioned soil. Firm the soil down around the roots.
- With container-grown bushes, keep the surface of the rootball compost level with the surrounding soil surface. Space cordons 30cm-45cm (12in to 18in) apart and bushes at least 1.2m (4ft) apart to allow access for picking.
- Keep plants well watered until established, and cover the soil around them with a 5cm to 7.5cm (2in to 3in) thick mulch of compost or bark.
- Net during June and July to protect fruit from birds.
How to prune and train
- Winter pruning helps to form a balanced branch structure and keeps the centre of the bush open to make picking easier. Mildew disease is also reduced if air circulation is encouraged.
- Fruits form on old wood and around the base of last year’s growth. Therefore prune back the previous year’s growth to two buds.
- Prune out any shoots that are growing into the centre of the bush, and cut back leaders by one-third.
- Summer pruning isn’t essential, but if possible prune sideshoots back to five leaves in June. This will allow the sun to reach into the centre of the bush and help ripen the fruit.
- Single-stemmed cordons can be trained on canes or against a wall where they can reach 1.8m (6ft) tall. In summer, prune sideshoots back to five leaves to encourage fruiting spurs to develop.
- Tie the leading shoot tip into the support as it grows. In winter, shorten the previous year’s growth on the main tip back by a quarter to encourage new sideshoots. Shorten sideshoots pruned in summer to two or three buds.
Growing tips
- Start thinning gooseberries during late May or early June, removing about half the crop. The fruits from this first harvest can be used for cooking. This will give a longer cropping season and leaves others more room to grow to a larger size.
- The second harvest can be done a few weeks later, and many of the fruits will be packed full of natural sugar and taste delicious.
Problem solving
Look out for gooseberry sawfly from late spring onwards. Check leaves regularly for caterpillar damage and control by hand. If this is proving hard, spray bushes regularly with an insecticide. Always try to grow varieties resistant to mildew.
Practical tips
- Never let plants go short of water when their fruits are swelling and ripening. Heavy watering after a drought can cause fruits to split and rot.
- If you aren’t growing your gooseberries in a fruit cage, cover bushes with netting during June and July to keep off birds. Ensure it’s weighted down at the base to prevent blackbirds getting underneath.
- Hungry bullfinches feed on the gooseberry buds in winter, so use netting to keep them at bay. Also delay pruning until the buds have started to grow in April. Thick growth helps to keep the birds away and you can be sure of pruning back to a living bud.
- Standard gooseberries make excellent plants for tubs. Choose a pot 35cm (14in) deep and wide and fill with a loam-based compost. Healthy shoots can be cut in autumn and early winter to use as hardwood cuttings which can be used to raise new bushes.
- Wear gloves and long sleeves when harvesting the fruit to protect hands and arms from the sharp thorns.
Four gooseberries to try
- ‘Invicta’ – makes a vigorous and spreading bush that bears large, pale green berries suitable for dessert and culinary use. It gives high yields when grown as a bush or cordon.
- ‘Greenfinch’ – excellent disease-resistant variety that forms quite compact bushes. Early yields of bright green fruits and is excellent for cooking
- ‘Whinham’s Industry’ – popular red-fruited variety, happy in partial shade. Good choice for heavy soils but prone to mildew
- ‘Careless’ – popular cooking variety with pale green fruits that gives heavy yields. Grows well on most soils but susceptible to mildew

There are many different varieties of peach and nectarine to try but for pot-grown trees a dwarf variety is needed.
If you prefer the smooth skins of nectarines then you could try ‘Nectarella’ or ‘Terrace Ruby’. These terrace fruits need virtually no pruning. They’re naturally slow growing and stay quite compact, perhaps reaching only 1.2m to 1.5m (4ft to 5ft) in ten years. Growing them in pots also keeps the trees smaller than planting them in a border.
What to do
Planting
- Remember that these trees come from a warmer climate and don’t like to sit in boggy ground.
- Make sure your container is free draining and if there aren’t enough holes in the base drill several more to improve drainage and prevent water-logging.
- Place potted trees in full sun.
Routine care
- Trees under cover grow rapidly so always feed and water well. Mulching in early spring conditions the soil and encourages it to retain moisture.
- It’s better to do occasional copious watering than frequent light applications. If pruning, do so in spring.
Flowers and pollination
- Peach and nectarine trees flower extremely early in the year, so to enjoy their flowering display and prevent blooms being damaged by frost, move potted trees under cover from mid-winter.
- Pot-grown trees are best grown outside until the end of December, then brought into an unheated greenhouse or conservatory, where they’ll flower from February through to early April, depending on the variety.
- Encourage more fruit by pollinating open blooms by hand using a soft brush, particularly as few insects will be out so early in the year to do the job. Misting over the blossoms with a fine spray of water can also help.
Fruit cultivation
- If a tree has a lot of developing fruits, thin them out. Start by removing every other one, leaving remaining fruits about 5cm (2in) apart. As the fruits develop, thin them again to give remaining fruits enough space to swell and ripen.
- The more fruits kept, the smaller they’ll grow. However, a three or four-year-old tree should easily carry 20 fruits. Early varieties, like ‘Terrace Ruby’, should be ready in July, and later varieties through August into early September.
Harvesting and storage
- Harvesting time is dependent on crop type and variety. It’s best to pick the fruits when they’re fully ripe.
- Hold one in your hand and use your thumb to apply gentle pressure to the part of the fruit nearest to the stalk. If it ‘gives’ slightly the fruit’s ready. Peaches and nectarines are best eaten as soon as possible but they can be stored for a few days in a cool place.
Pests and diseases
- Peach trees can be attacked by aphids, birds, red spider mites, earwigs and root-knot nematodes. Diseases include botrytis, bacterial canker and peach leaf curl. However patio grown trees are less likely to suffer from these problems.
Five peaches/nectarines to try
- ‘Bonanza’ – a very slow, compact growing peach tree that needs no pruning
- ‘Garden Lady ‘ – a wonderful peach with yellow flesh that fruits in mid-season
- ‘Nectarella’ – good quality nectarine with orange red flesh and a ‘mop head’ of leaves
- ‘Terrace Ruby’ – pink flowers in spring and large, juicy, yellow fleshed nectarines in summer.
- ‘Nucipersica’ – will produce fruit in the first year after planting

Raspberries are best grown from bare-root plants in the autumn.
There are lots of different varieties available, which bear fruit at different times, most are harvested between early and late summer, while others are grown for their autumn berries.
What to do
Soil preparation
- Get the planting site ready by removing weeds and digging in plenty of well-rotted manure a few weeks before planting.
Making supports
- Raspberries are best grown against supports. In a large garden or allotment, hammer two 2.4m (8ft) tree stakes into the ground 60cm (24in) deep, about 3m (10ft) apart.
- If growing summer varieties, drill holes into the posts and stretch three rows of galvanised wires (12 gauge) between them – these should be 76cm (30in), 106cm (42in) and 167cm (66in) above the ground and held in place by straining bolts, which can be tightened with a spanner.
- If you have an autumn variety, there’s no need to add the top wire.
- If you have a tiny garden, grow plants up a single tree stake. Hammer a stout 2.4m (8ft) stake into the ground and plant two raspberry canes at the base. Allow 12 canes to grow up and keep in place with garden twine.
Planting out
- The planting depth is important with raspberries and as a rule of thumb, aim for the old soil mark on the stem to be at the same level as the ground after planting. To do this, dig a shallow hole, about 30cm (1ft) wide and 8cm (3in) deep.
- Spread out the roots and cover with soil, firming as you go. Plant canes 40cm (16in) apart. Cut canes down to 30cm (1ft) above the soil, pruning above a bud, and water well.
Pruning and training
- Prune canes that held fruit in summer during the autumn, cutting them right back to the ground. Tie in about eight of the strongest new canes from each plant to fruit next year, and remove the rest.
- In mid-winter, cut back lanky top growth so canes are about 15cm (6in) above the top wire.
- Prune autumn fruiting varieties in mid-winter, cutting the old canes back to ground level. Tie in new stems to the supporting wires as they grow, using garden twine.
Looking after the crop
- Raspberries are a hungry and thirsty fruit. Scatter general purpose granular fertiliser over the soil in spring and mulch with well-rotted farmyard manure.
- Keep plants damp, especially during dry weather.
Harvesting
- Pick fruit regularly when it’s firm. Pull the raspberries gently from the plant, leaving behind the plug that held it in place.
Five raspberries to try
- ‘Glen Moy’ – spine free canes, heavy crops in early summer
- ‘Glen Prosen’ – firm fruit in mid-summer
- ‘Allgold’ – yellow fruit in autumn
- ‘Malling Admiral’ – conical, dark red fruit in late mid-summer
- ‘Autumn Bliss’ – large red fruit in autumn

Strawberries can be grown in a wide range of soils, from light sand to heavy clay.
However, water-logging will cause the fruits to become diseased and the plant to rot.
The ideal soil is well-drained and rich in humus. They prefer to be planted in full sun, out of the wind.
Plants can be planted outdoors from late June until September. If planted later, the flowers should be removed in the first year so the energy is used to develop a healthy plant in year two.
Strawberry plants can produce fruit for five or six years. But after the first two years the yields will be reduced dramatically and a build-up of pests and diseases can occur. Strawberry beds are usually kept for two or three years before they’re cleared and planted on new ground.
What to do
How to plant
- Prepare the soil by digging over, removing any perennial weeds and adding manure.
- Place the strawberry plants every 35cm (13 in) in rows that are 75cm (30 in) apart.
- Plant with the crown at soil level and water well.
- To prevent slugs, put down pellets or place grit or broken egg shells under each plant.
- Place a net over the plants to prevent birds and squirrels from eating the fruit.
- Pick any ripe strawberries so they don’t rot on the plant. Check the plants every other day during the ripening period.
Growing tips
- Regularly hoe between the rows and individual plants. You might also want to place a net over the strawberries to stop birds and squirrels from eating the fruit.
- From late May, place straw in the rows and under the fruit trusses to suppress weeds and prevent the fruit lying on the ground.
- Barley straw is the best option, as it’s softer and more pliable. If you can’t get straw, use polythene sheeting.
- It’s possible to extend the growing season by placing early strawberry varieties under cloches or polythene covers in late March. Grown in this way, the plants should produce fruit two to three weeks earlier than normal.
How to grow in a basket
- Growing strawberries in a hanging basket ensures they’re kept out of the way of slugs.
- Plant five to six plants in a basket in spring, and water every day during the growing season.
- From flowering until harvest, feed the plants every ten days with a product that’s high in potassium, such as a tomato feed.
- The same strawberry plants should continue to produce fruit the following year, but the crops will be better if the plants are renewed.
How to harvest
- It’s important to pick any fruit as soon as it’s ripe to prevent it rotting on the plant. Check the plants every other day during the ripening period.
- The fruit is ready when it has turned red, although different varieties have different shades.
- It’s best to harvest the fruit in dry weather. Pick gently to avoid bruising and make sure the green stalk (calyx) remains with the fruit.
Aftercare
- After harvesting, remove the straw or matting that has been protecting fruit from the ground. Compost straw and debris, or clean and store matting for next year.
- Cut off old leaves with hand shears and remove, leaving the crown and new leaves untouched. This allows sunlight into the centre of the plant, ensuring a better crop next year.
- Feed and water well.
- Leave nets off to allow birds to pick off any pests.
Propagation
- It’s simple to make more strawberry plants. The plants send out runners over the surface of the soil during the growing season. These can be pegged down, usually in June or July, while attached to the mother plant. Eventually, they will form a separate plant.
Don’t allow more than five runners to develop from each plant. In August, when the runner plants are well established, cut them from the parent and transplant immediately.
Five strawberries to try
- ‘Elvira’ – a heavy cropper producing large, soft fruits from June to early July
- ‘Hapil’ – high-yielding variety with large, bright red fruits from early to late July
- ‘Florence’ – grows well in all soils and produces large, dark fruit in late summer
- ‘Vivarosa’ – one of the few varieties to produce pink (instead of white) flowers
- Fragaria vesca – provides good ground cover in cottage gardens